A Quick Hack to Convert Drum Audio to MIDI in Pro Tools
A fast Pro Tools workflow for turning kick and snare audio into accurate MIDI triggers without losing the feel of the original performance.
Short answer
The workflow uses Tab to Transient, an instrument track grouped with the close mic, and a pre-cut MIDI clip that gets pasted onto each detected hit. It is useful for layering samples, auditioning sounds, and tightening drum replacement while still checking the result against the source audio.
Key takeaways
- Get the drum sound right at tracking whenever possible. Samples are a fix or layer, not a replacement for a good performance.
- Use a grouped instrument track and close mic track so Tab to Transient and paste stay locked to the original audio.
- Build one perfect MIDI note first, cut it, then paste it onto each transient with Tab and V.
- After the paste pass, do a velocity, alignment, polarity, and blend check before printing the sample track.
Why use drum samples?
The best drum sound still starts at the recording stage. But sometimes you inherit tracks with weak close mics, need a synthetic layer, or are working in a genre where sample reinforcement is part of the sound.
Drum samples can solve those problems when they are programmed carefully. MIDI gives you more flexibility than printed sample audio: you can audition libraries, duplicate layers, adjust velocity, and keep the performance responsive.
When this workflow is worth using
This is most useful when the drummer played the right part but the close mic does not give the mix enough weight. A common case is a kick that has the right timing but not enough low end, or a snare that needs a tighter crack without losing the room and overhead sound.
It is also useful for deliberate production choices. Metal, hard rock, pop, electronic, and hybrid records often use a sample layer because the mix needs a consistent front edge. The goal is not to erase the player. The goal is to support the player with a controllable layer.
If the source performance is messy, fix the edit first. If the mic placement was the problem and you still have access to the drummer, re-recording may be faster than rebuilding every hit.
Before you start
Duplicate the playlist or save a new session version before you make a trigger pass. Commit any drum edits first, because the MIDI layer should follow the final close mic timing. If you change the drum edit after the MIDI is placed, you have to check the whole layer again.
Choose a sample that already points in the direction of the mix. For a kick, decide whether you need more sub, more beater, or more length. For a snare, decide whether the layer is adding body, crack, or a gated effect. A good sample choice makes the blend stage simple.
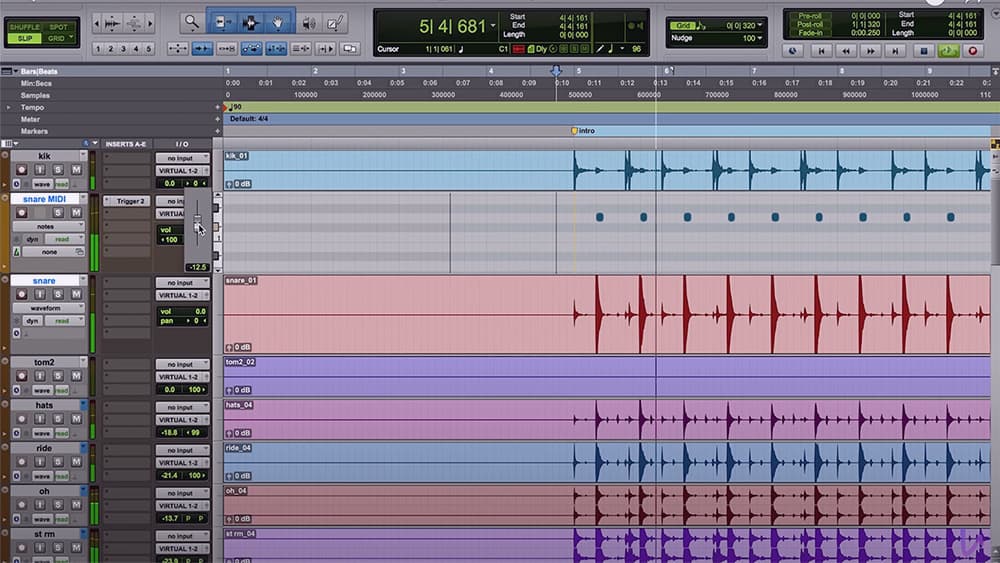
Put the close mic and the new instrument track next to each other in the edit window. Set your nudge value small enough to make quick timing corrections, then zoom in far enough that individual transients are obvious.
Set up the MIDI trigger track
Create an instrument track directly above the close mic you want to reinforce. If you are replacing kick, put the instrument track above the inner kick mic and load your drum library there.
In grid mode, write one MIDI note for the drum you are triggering, usually C1 for kick. Put it exactly on a bar line at full velocity. Then change the view to clips, highlight that new MIDI clip, and cut it.
Keep the MIDI note short and clean. You are building a reusable trigger clip, not a musical phrase. If the sample library maps the drum to a different note, use that note instead of C1. The important part is that the note, velocity, and length are correct before you start pasting.
Use Tab to Transient and paste
Group the MIDI track and the close mic track. Turn on Tab to Transient and keyboard focus. Go to the beginning of the song, hit Tab until the cursor lands on the first transient, then press V to paste the MIDI clip above it.
Repeat that movement through the song. I usually keep one finger on Tab and one on V, which makes the pass fast. If you miss a hit, use Option-Tab to move back to the previous transient and correct it.
Work in sections instead of trying to fly through the whole song in one pass. Verses, choruses, and fills each have different transient shapes. A slow fill with open cymbals may need more manual attention than a straight kick pattern.
Check the alignment
After the first pass, consolidate the MIDI track into one clip, switch to Notes view, and tab through the MIDI notes while watching the source audio below it. You will see quickly if a note landed early or late.
Once the MIDI is lined up, audition different drum sounds, adjust velocities, and layer libraries as needed. The point is speed without giving up the feel of the performance.
Shape the velocity and feel
Do not leave every hit at 127 unless that is the actual production choice. A real drummer does not hit every kick or snare at the same intensity, and a flat MIDI layer can make the track feel smaller even when it sounds louder.
Start by lowering the whole MIDI part until the sample stops jumping out. Then bring up important downbeats, chorus hits, and fills. If you are reinforcing snare ghost notes, keep those much lower than the main backbeat or use a separate softer articulation.
Quantize only when the production calls for it. If the original performance pushes and pulls in a way that feels good, preserve that. The sample should make the drum more finished, not more robotic.
Blend the sample with the kit
Pull the sample fader all the way down, play the full kit, then bring the sample up until the close mic starts to feel finished. Most of the time the right level is lower than you expect. The overheads and rooms should still tell the listener where the drum lives.
Check polarity against the original close mic. Flip polarity on the sample track and keep the setting that gives you the strongest, most natural low end and attack. If neither setting feels right, the sample may be slightly early or late, or it may be the wrong sample for the source.
Use EQ to make the layer do one job. For kick, that may mean high passing the sample so it only adds beater, or low passing it so it only adds sub. For snare, it may mean filtering out ring so the layer adds crack without fighting the live shell tone.
Quality control before printing
Listen through the song with the MIDI layer soloed against the close mic. Fills, flams, drags, and fast kick doubles are where mistakes hide. Fix those by hand instead of trusting the first pass.
Then listen in the full mix, in mono, and with the sample muted on and off. The layer should make the drum more believable in context. If the mix only sounds impressive when the sample is too loud, pick a better sample or revisit the source processing.
Once the MIDI is aligned, shaped, and blended, print the instrument to audio or keep the MIDI active if the session still needs flexibility. Either way, label the track clearly so the mix session shows which layer is source audio and which layer is reinforcement.
Related tools
The original note used Steven Slate Trigger and GetGood Drums as examples. Any library or trigger workflow can work as long as your MIDI placement follows the original performance.
For a broader release workflow, pair this with the audio file prep guide.